Validator Deposit Launchpad
After you generated the deposit keys, you can visit the LUKSO Validator Deposit Launchpads for the LUKSO Blockchain top put stake on them:
Make sure to check the
lukso.networkdomain before continuing with the deposit process.

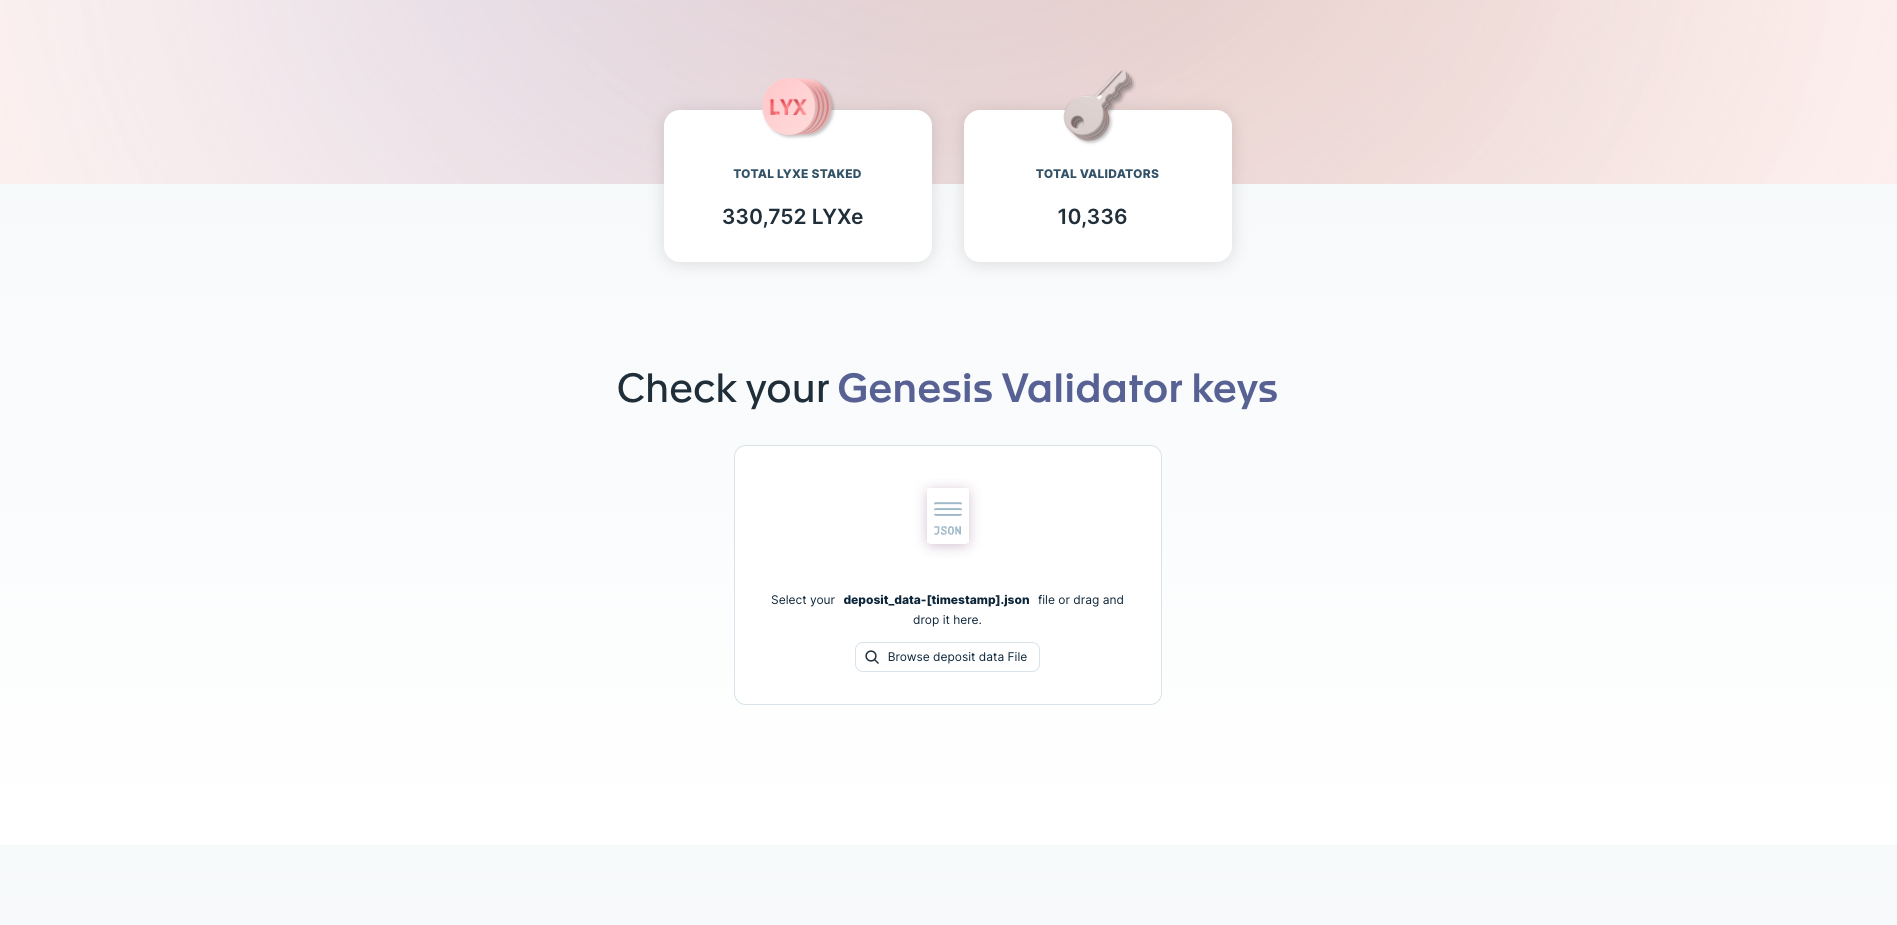
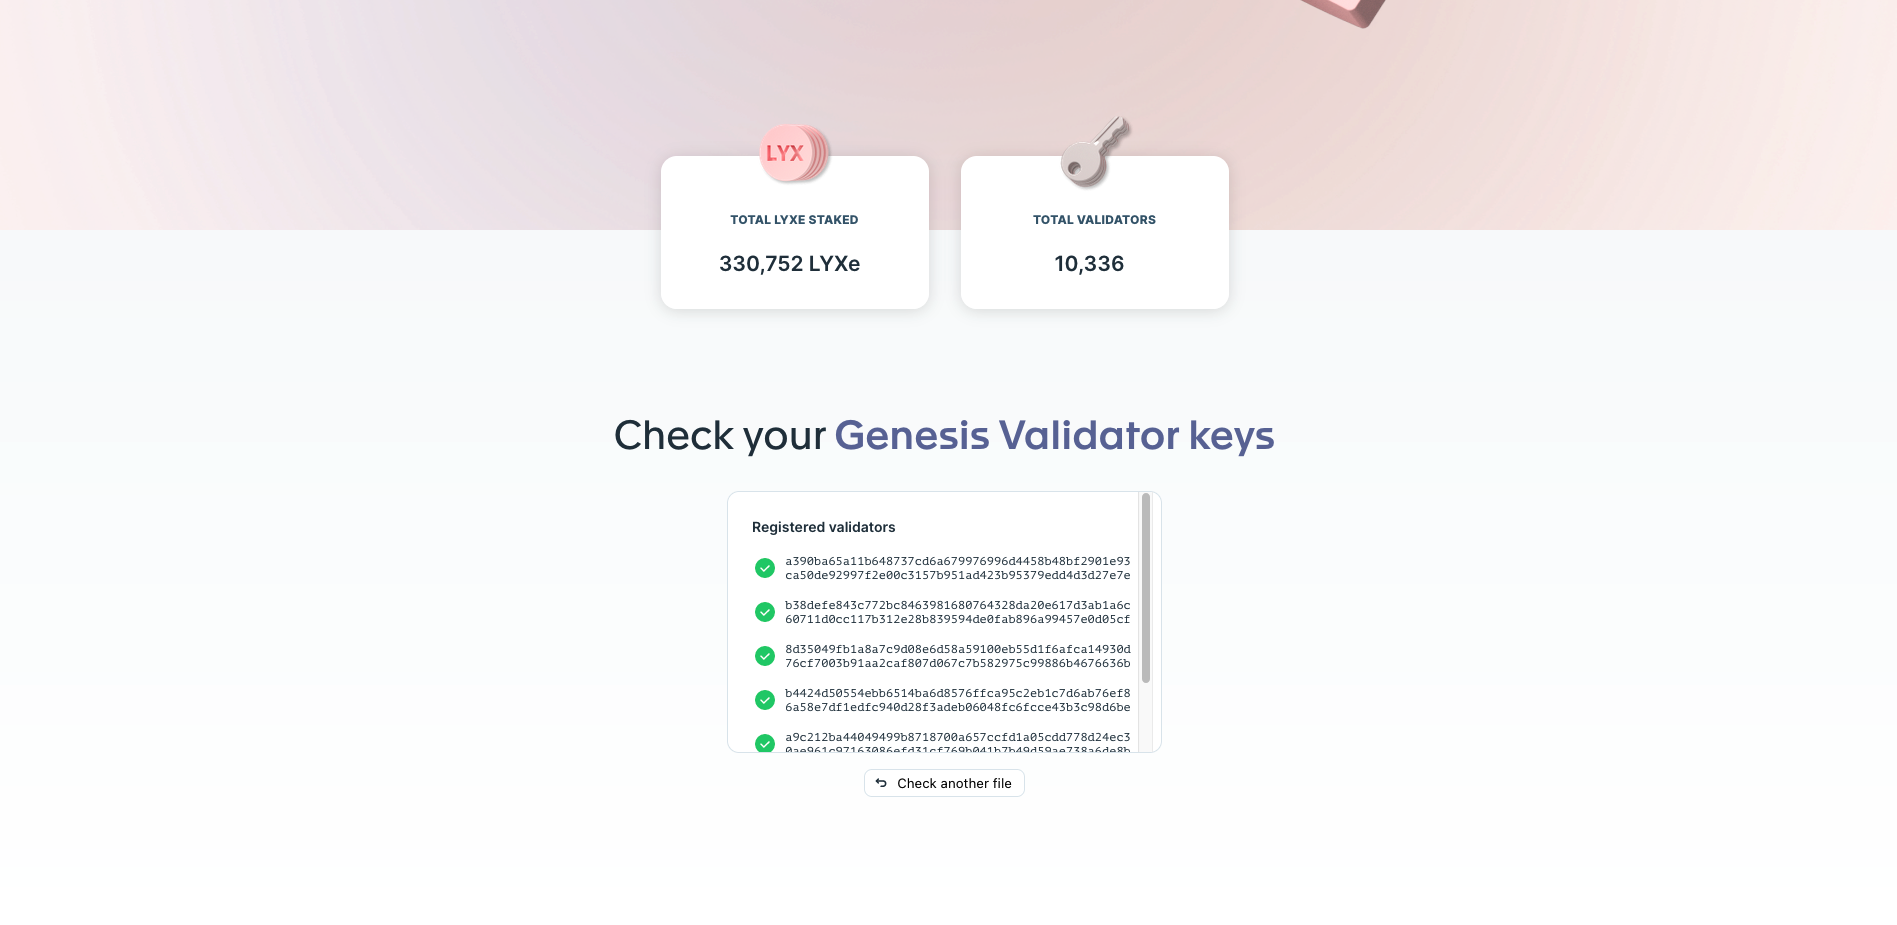
Start to have a look at the launchpad's functionality and stats. For each network, you will get decent information about the LYXe or LYXt staked and the amount of validators. The testnetwork even features the current annual percentrage rate for returns as the network is already running.
If you want to have some more insights to the mainnet's genesis validators, here is a great Dune Analytics Dashboard from Hugo.
Preparing Deposit Files
First off ye gonna prepare the deposit files and do an initial check of the deposit.json files.
In case you want to do deposits (for the same or different) validators from multiple wallets, there are two main variants to handle these:
- Generate batches with the same seed. Here you have multiple folders for each of the wallets with respective validator numbers created by following the Key Generation guides. For instance: if you have 30 validators and 3 different wallets with 320 LYXe/LYX each, you created 10 validators each using the same seed, or even the same withdrawal address. In the first run, you specidied that you want to generate 10 keys from a fresh seed. In the second run, you specified that you already had 10 keys. In the 3rd run, you specified you already have 20 keys and generated the last 10. You ended up with 3 different folders having 3 different deposit files.
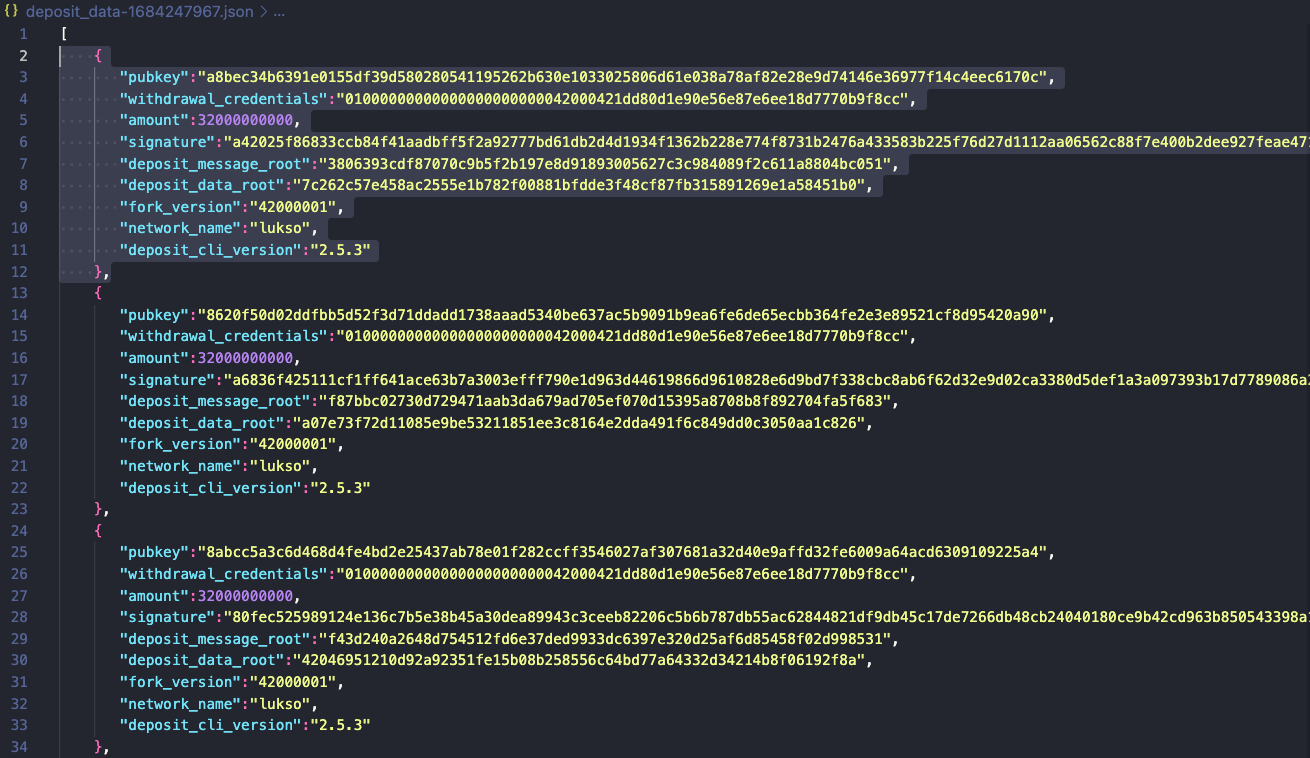
- Modify the deposit file after you generated your total amount of keys in one folder. Here, create duplicates of the
deposit_data.jsonfile. Open it up using a JSON Editor and remove as manypubkeyelements as you want. For instance: if you have 30 validators and 3 different wallets with 320 LYXe/LYX each, you generated 30 validators in one step. Afterwards you made three copies of the deposit file. In the 1st copy, you deleted everything after your 10thpubkey(leaving you with validators 1-10.) In the 2nd copy, you deleted the first and last tenpubkeyelements (leaving you with validator 11-20.) In the 3rd copy, you deleted the first 20pubkeyelements (leaving you with validators 21-30.) You will end up with one folder but 3 deposit files.
If your wallets have different amounts of LYXt, LYXe, or LYX, adjust the pubkeys and validator amounts accordingly so it matches the coins your hold.
For the 2nd variant, it's recommended to use an editor with JSON formatting. This way, you can easily detect the different pubkey blocks. As shown in the picture, thake a certain amount of blocks and remove it. Always make sure that the JSON format is still valid and there is a comma between pubkey elements. Also be cautious with deleting to many brackets.
In both cases, you will have to go through the launchpad process 3 times, as the launchpad will check if your wallets have enough balance, before you can continue to the deposit screen.
If you only have one wallet, just run through the process once.
Checking Deposits for Genesis Validators
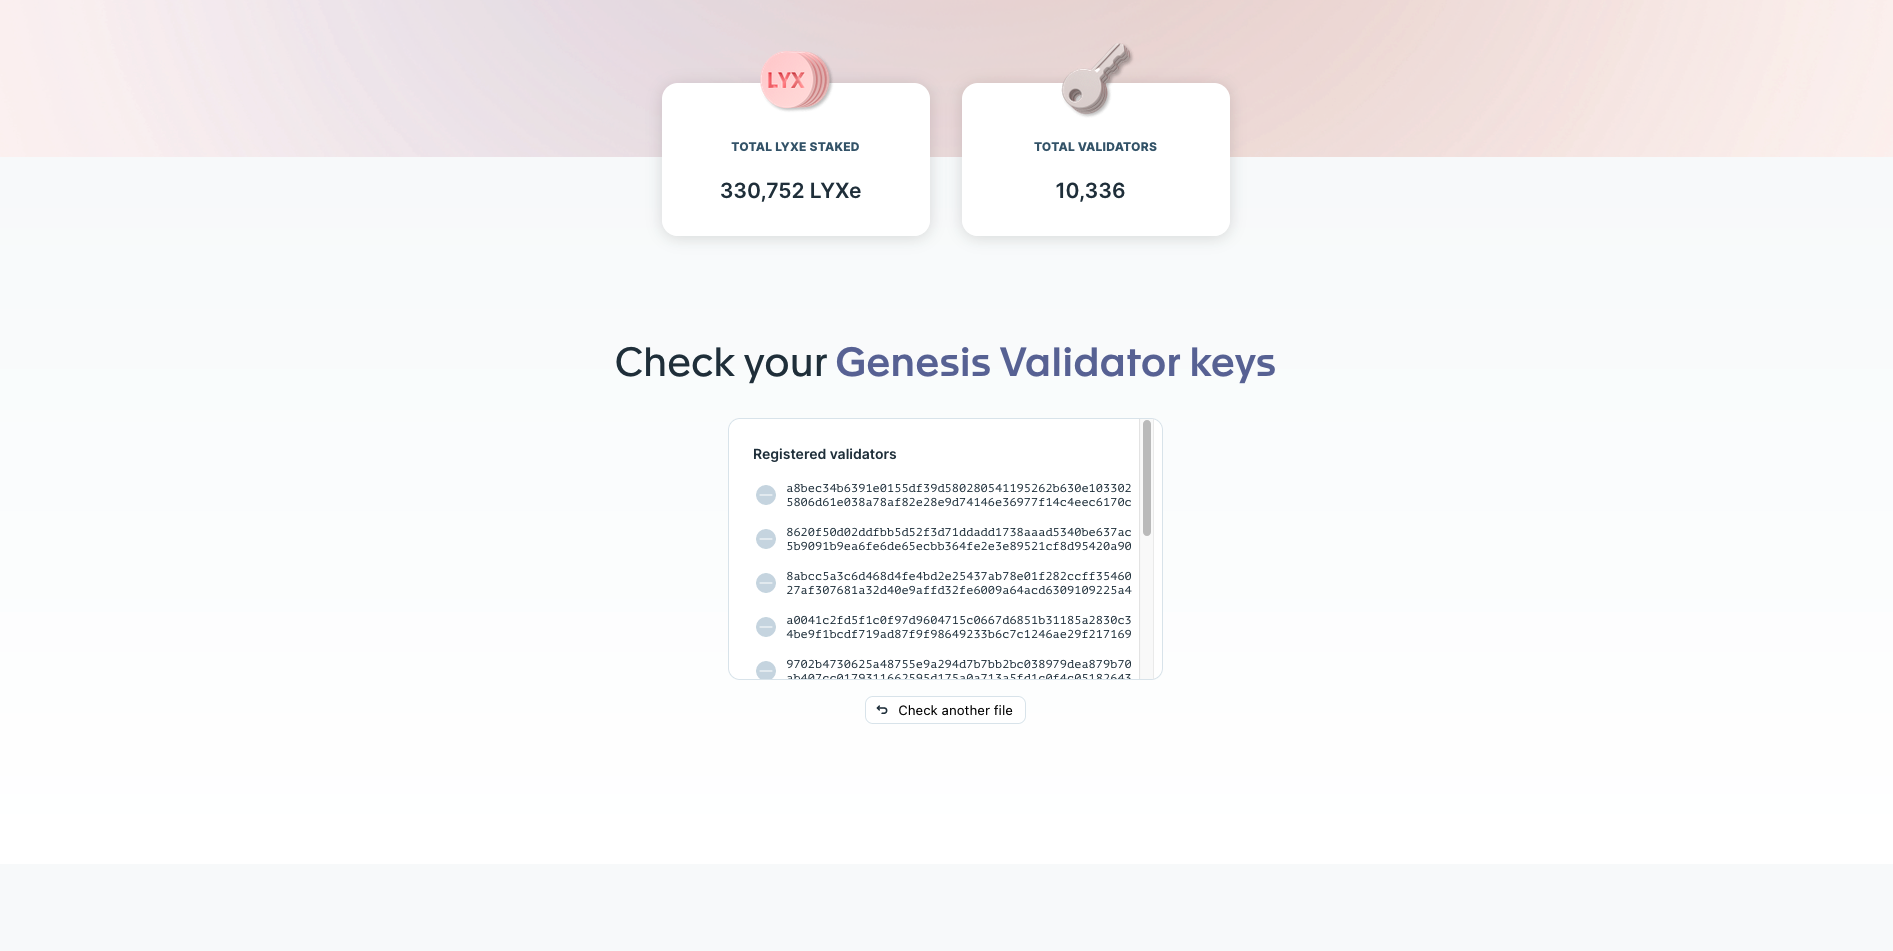
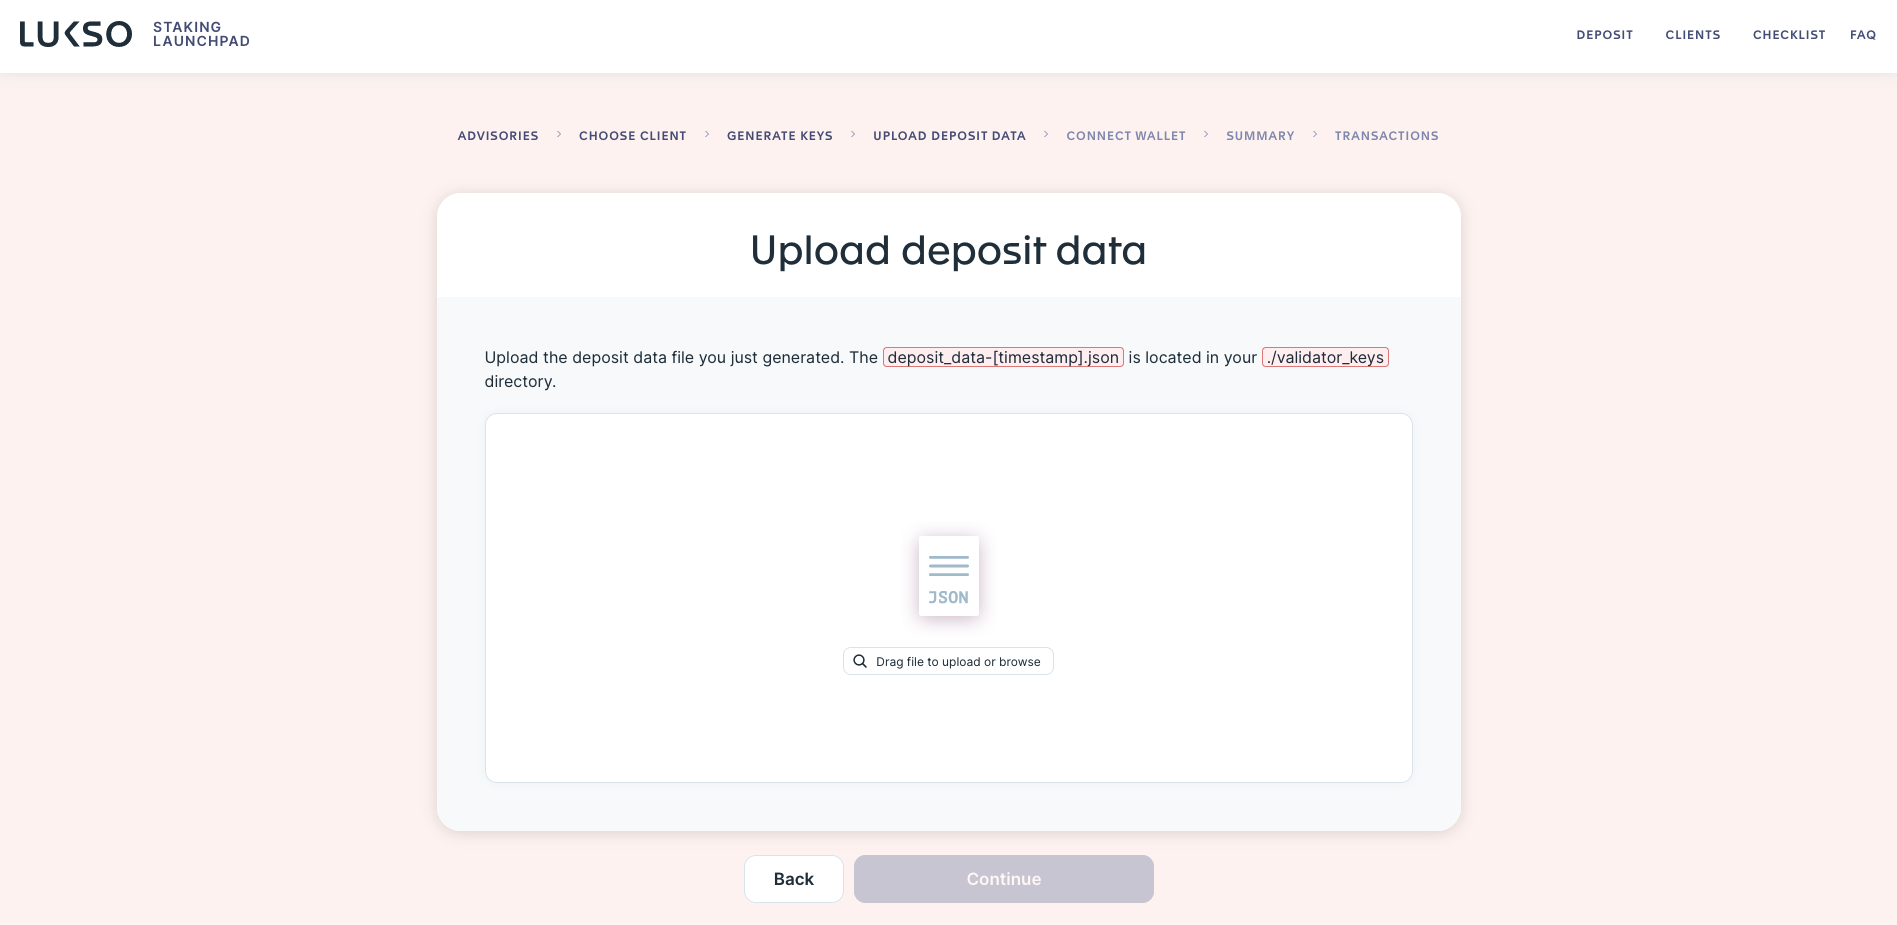
To verify if your deposit file is valid and can be used, upload it to the front page of the launchpad.
On an unused deposit file, everything will show with grey symbols, indicating that nothing was deposited yet.
If you have multiple files, check if all keys are in the right place and nothing is duplicated. The launchpad will detect duplicates, however you might miss a key.
During the further process of depositing, its recommended to always have a second browser window where you can check the deposit file with all total validator keys in in. So you know exactly whats going on.
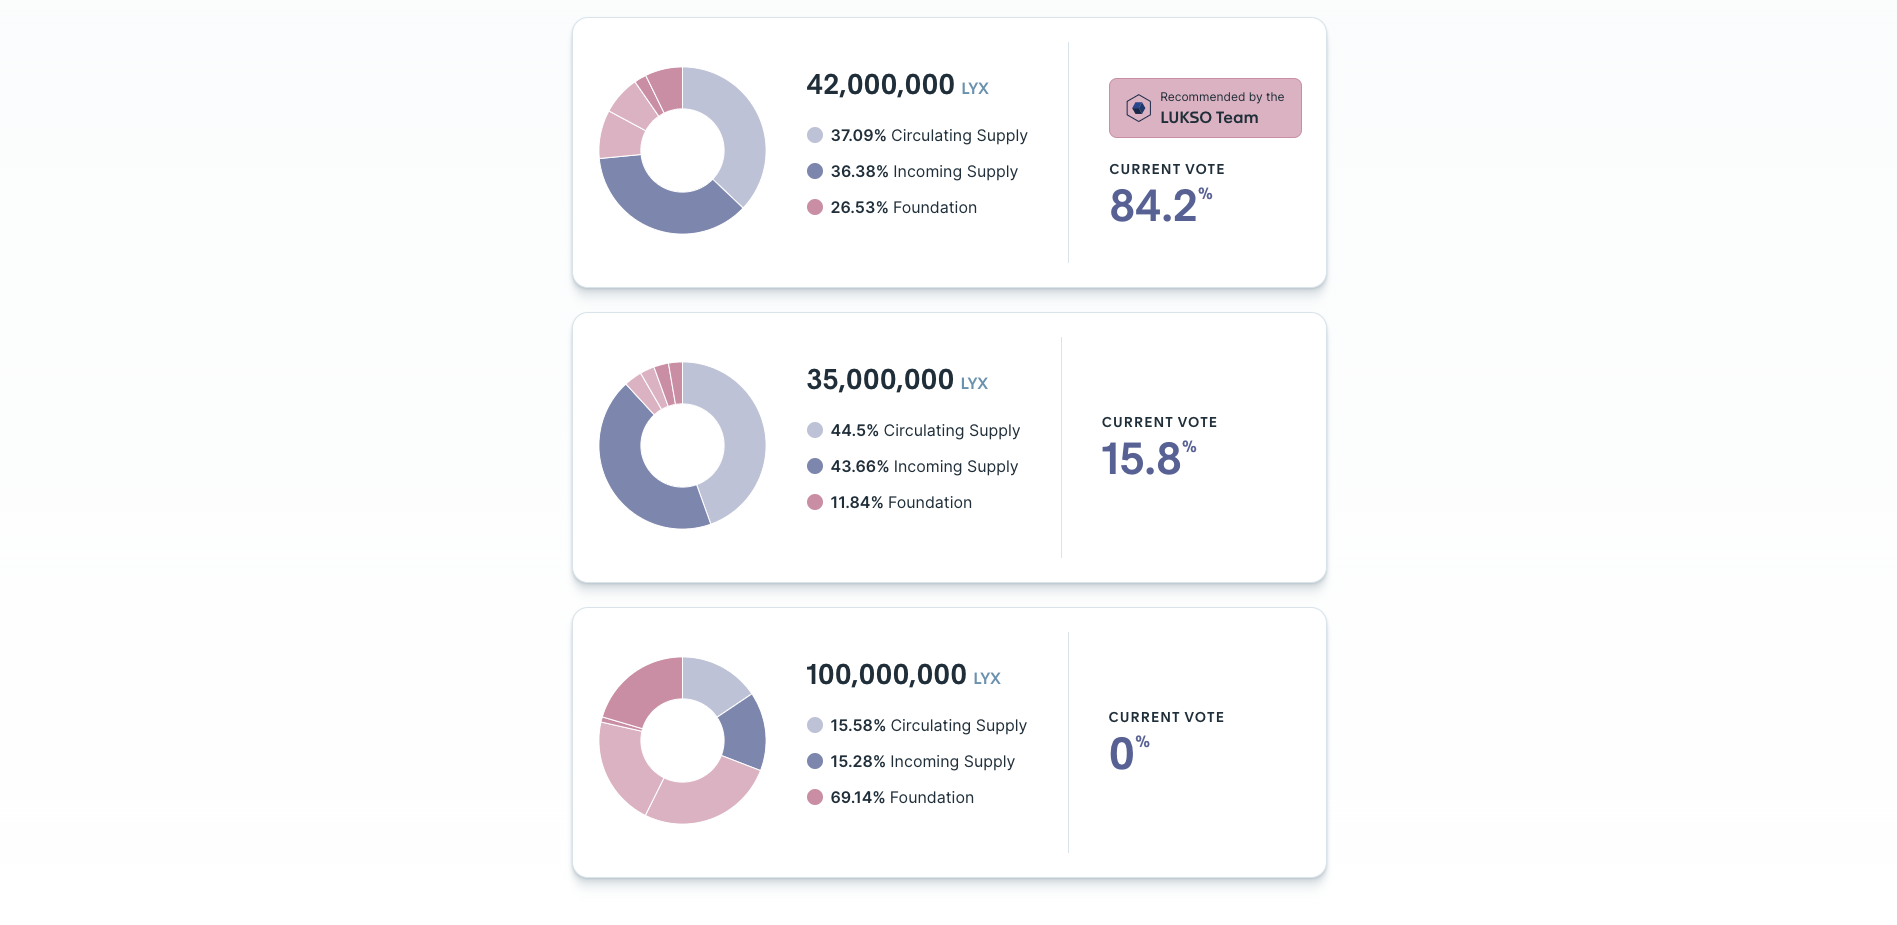
In case of the genesis validator page, you can also have a look at the current votes for the initial coin supply of the network.
Checking Deposits for Testnet Validators
For Testnet depositors, you can instead check your address and it will show the amount of validators you have still left. Each wallet will have a amount of validators they are allowed to deposit in total.
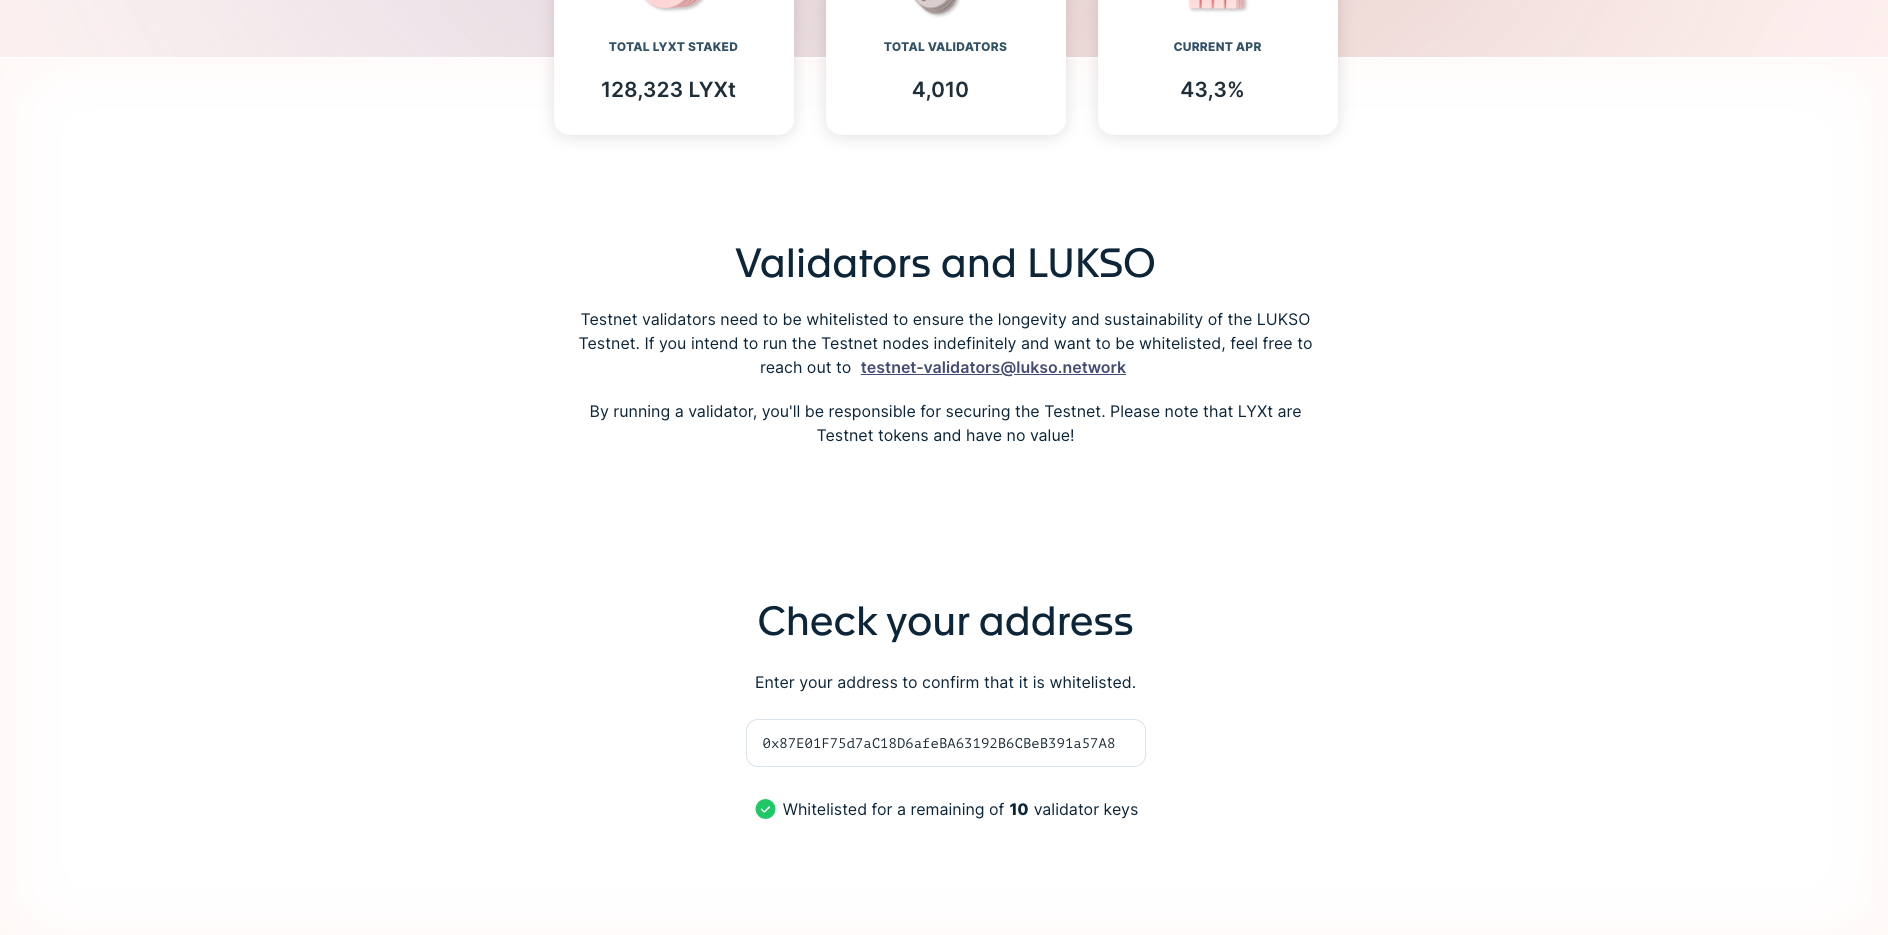
Note that the whitelisting only affects making deposits, not becoming a validator. If you get removed from the whitelist before you deposited all your validators, you will no longer be able to proceed.
Starting the Deposit Process
If you click Become a validator on the home screen, you will start the process of depositing funds. There are lots of pages covering what you need to know, how to use the ethereum clients and so on. Read them carefully and take notes, in case something is unclear. Make sure you fully understand all the theoretical concepts and risks before locking valuable assets.

After going through all the theoretical pages and information, you can upload your (first) deposit data file that will be actively used to perform the deposits in the next steps.
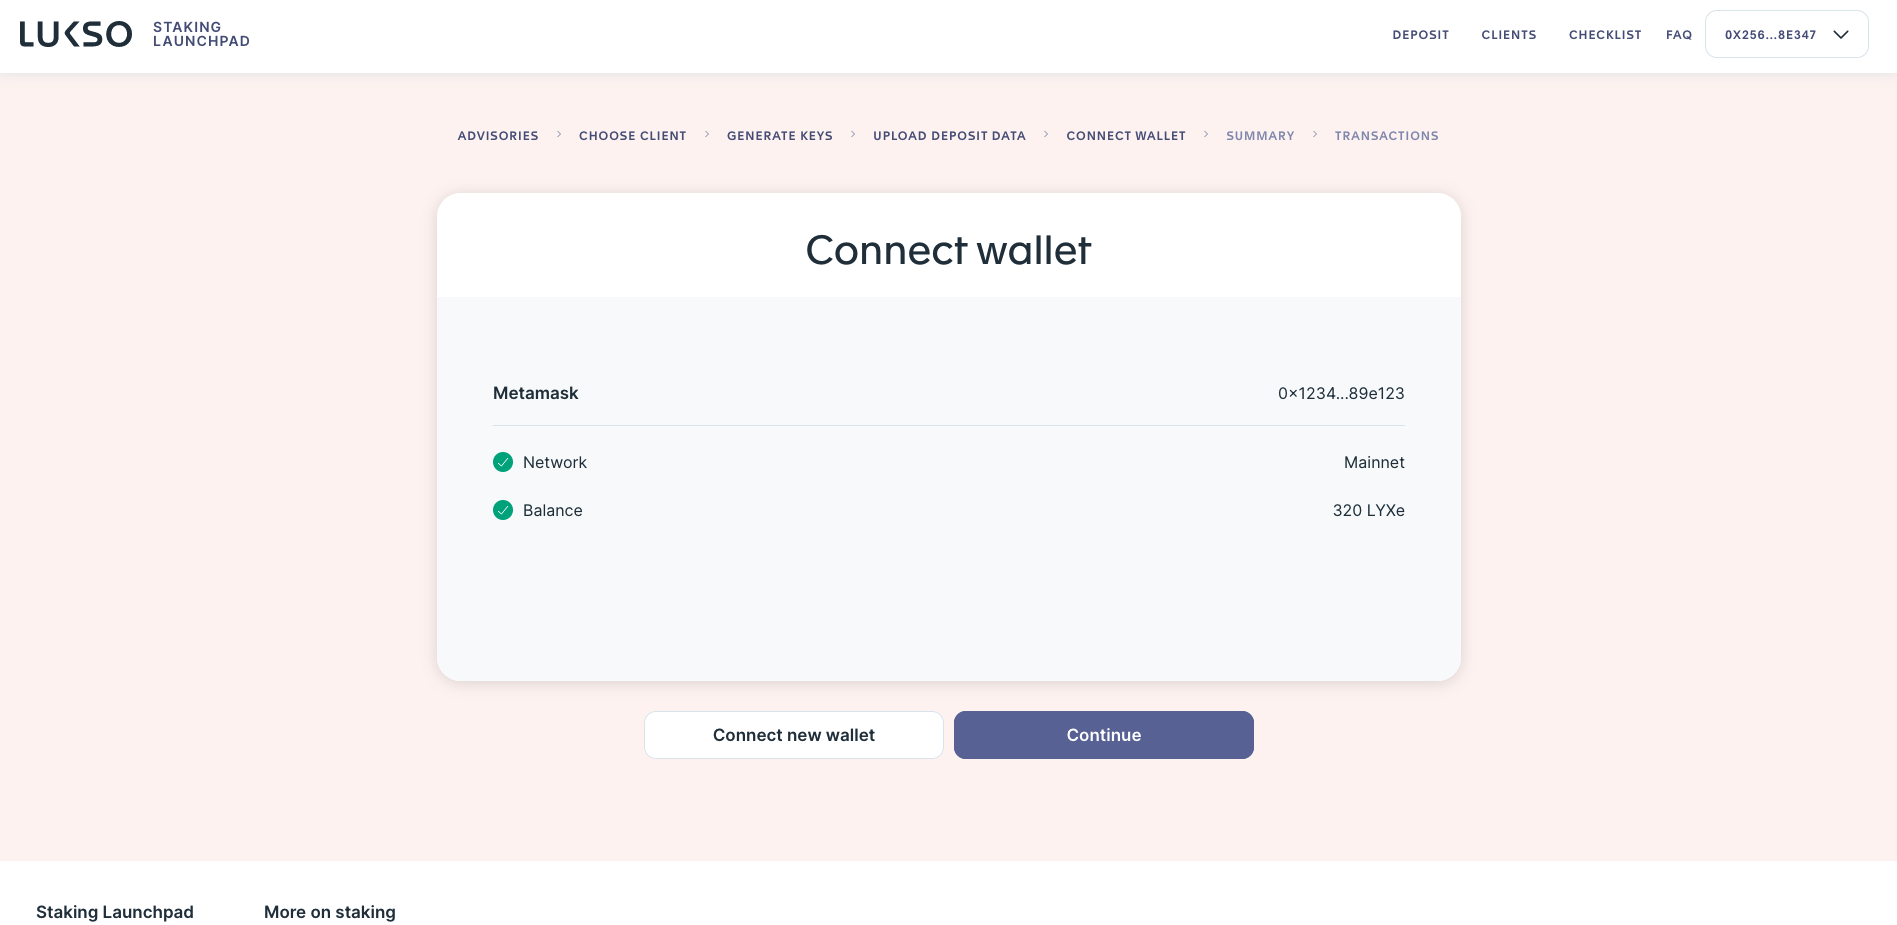
After uploading your deposit file, connect the wallet you want to use on the launchpad.

After selecting the wallet for the import, you will get to the checkup screen that will fetch you current balance of LYXt, LYXe, or LYX. If you have enough funds, the launchpad will let you continue with the next step.
As you carefully prepared your deposit folders or files, this step should not should be no problem.
When you continue, you will see the summary of your deposit keys that will be transformed into transaction data when you continue. Read this page carefully and agree to all terms.
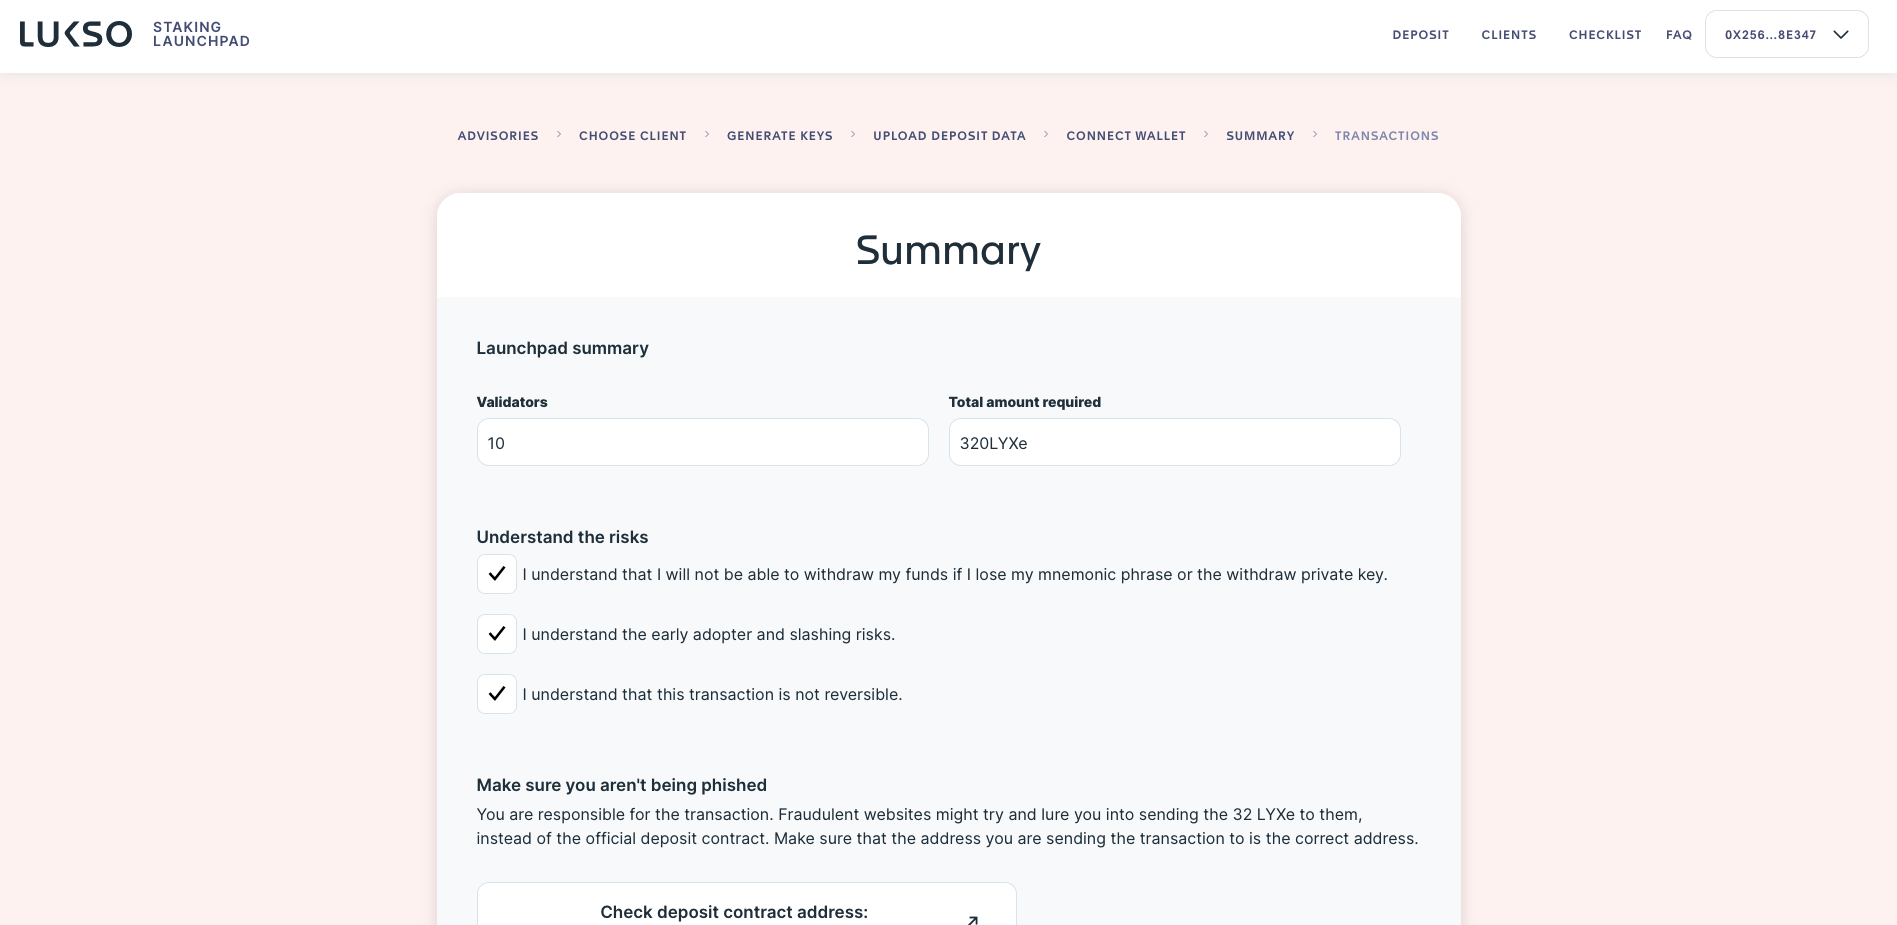
During the genesis deposit time, the final page will show a selection of initial coin supplies that you can choose from. Your choice will be used for every single transaction, so you could also change votes during the process, when doing all transactions in a standalone way.
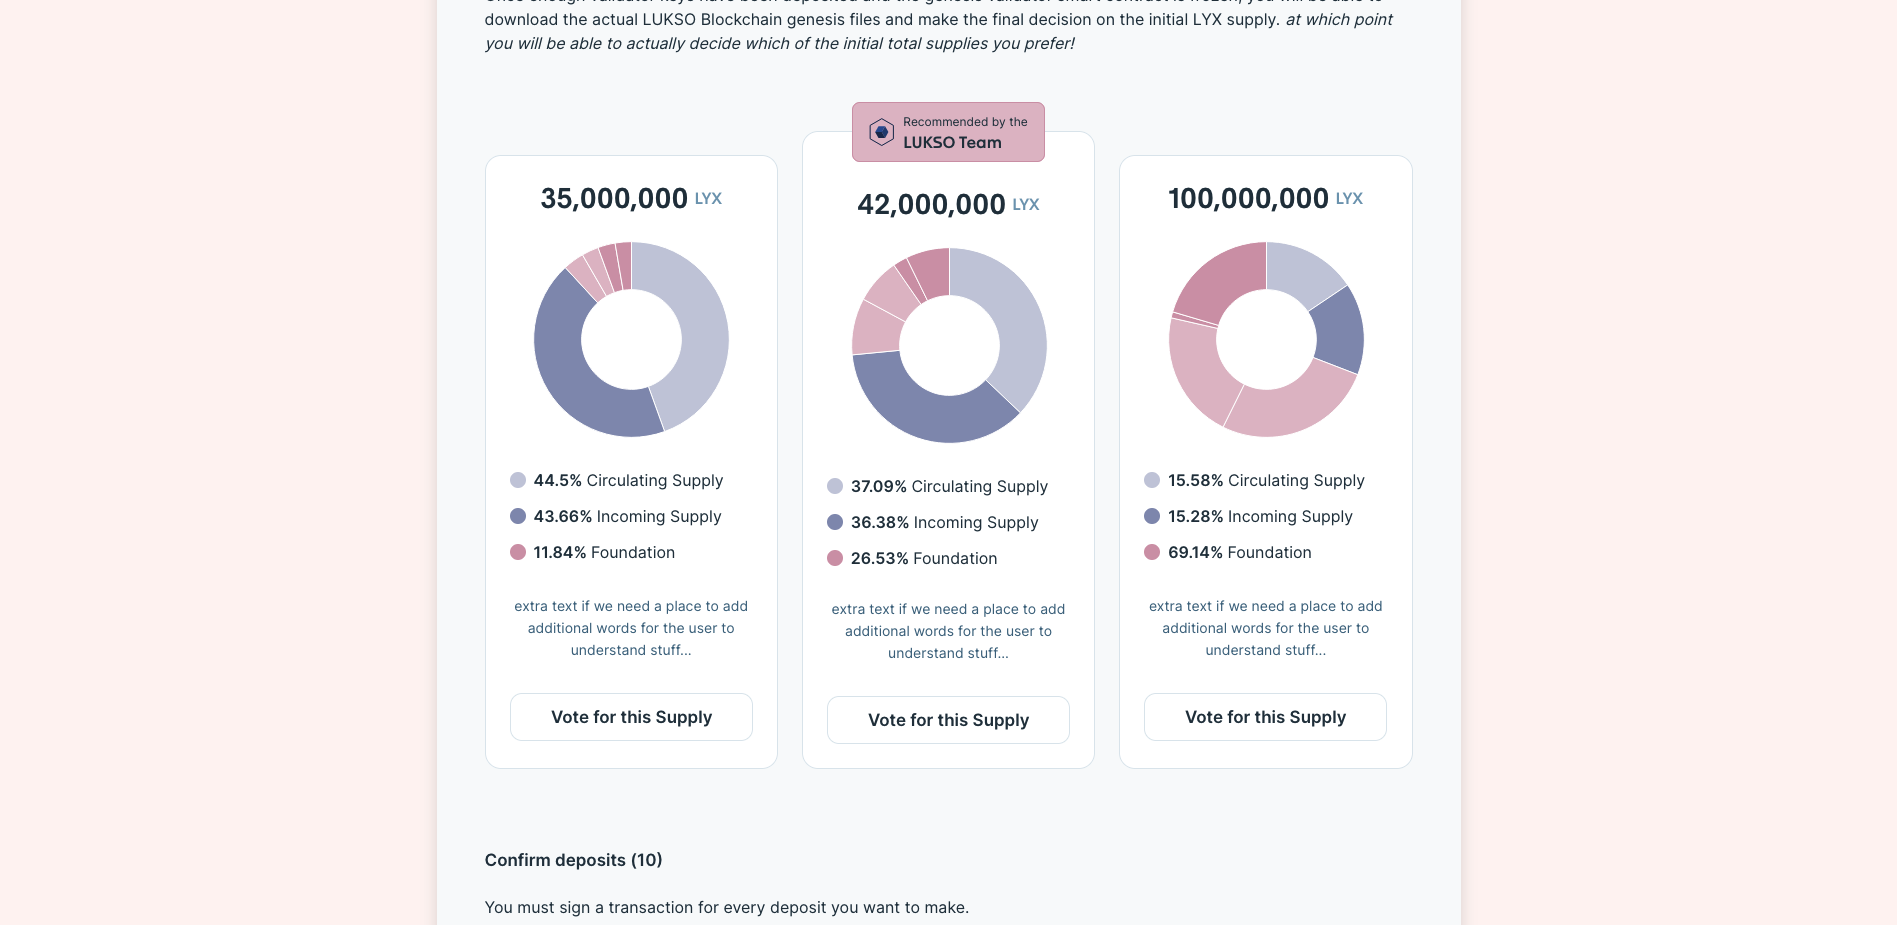
Choose your wished coin supply during network launch and continue sending the transaction by either using the Confirm deposit or Send X deposits button. The second choice will switch transactions in series, however, you will still be promted to confirm every single one of them.
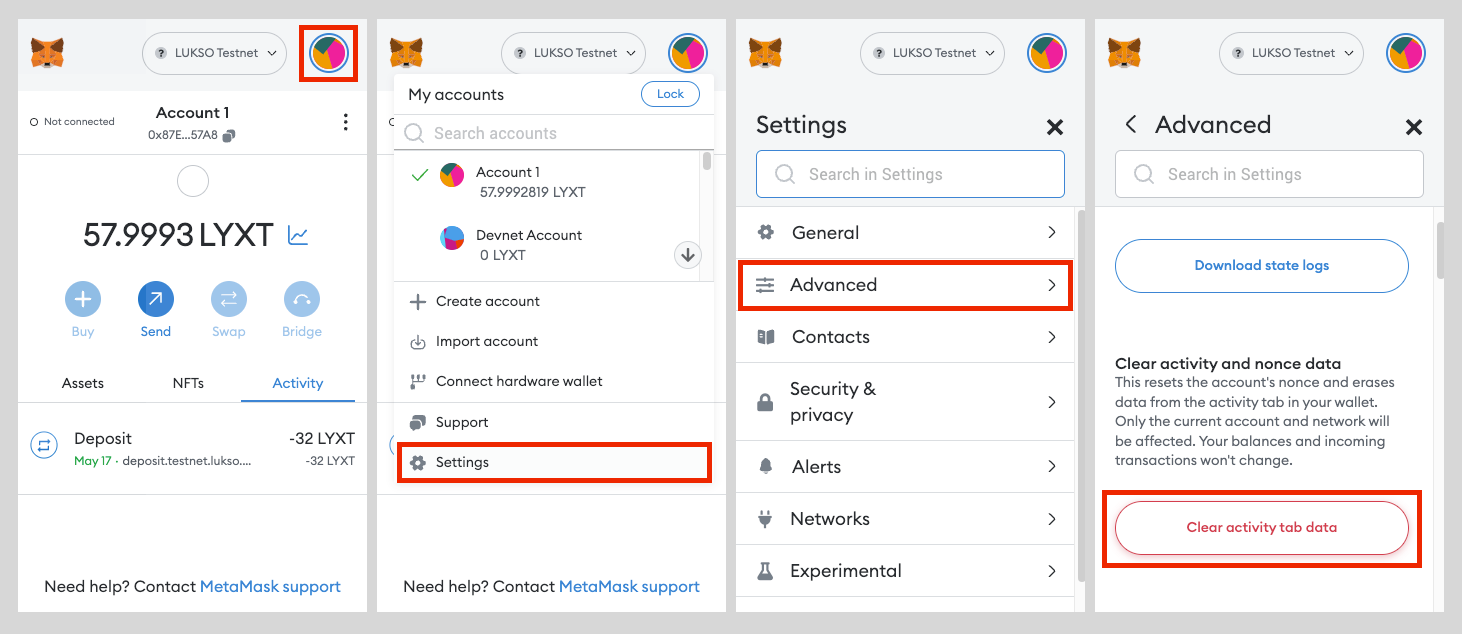
If you are doing deposits on Testnet, make sure to clean your MetaMask activity and nonce before you make deposits. Otherwise they might get stuck if you have multiple networks set with the same ID or URL.
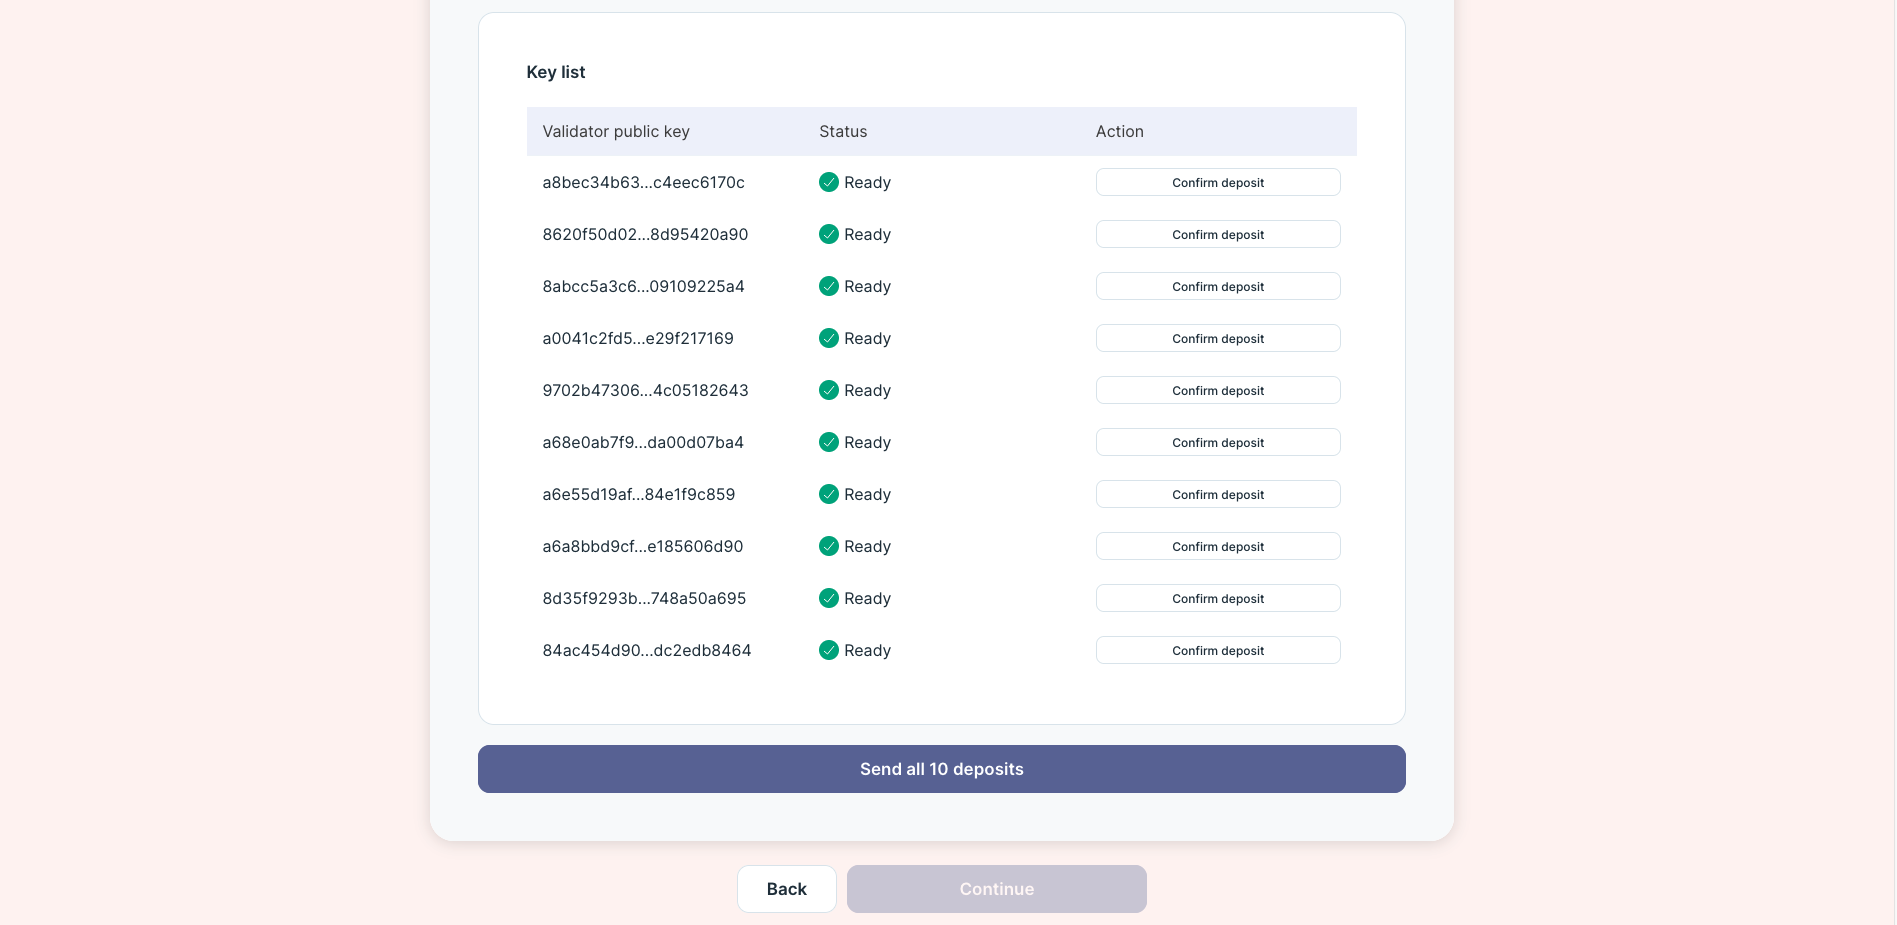
Initially, the deposit keys will show Ready. The status will change to Transaction pending, Deposited, or Error depending on the state of the transaction on the mainnet. If there should be an error, you have the change to resend the transaction.
In case there is an error and you are not able to resend the transaction from the final screen, please move to the homescreen and check your deposit file again. Create another copy, remove all the paydata entries that already have been successful, and reenter the launchpad process again using only the deposit keys marked in grey.
After everything went through, go back to the homescreen and check your progress in the deposit file.
Checking Deposits
After the transaction was send, you can click on on the Transaction or Beaconchain Transaction button based on if you are using the Launchpad for Testnet, Genesis Mainnet or Regular Mainnet.
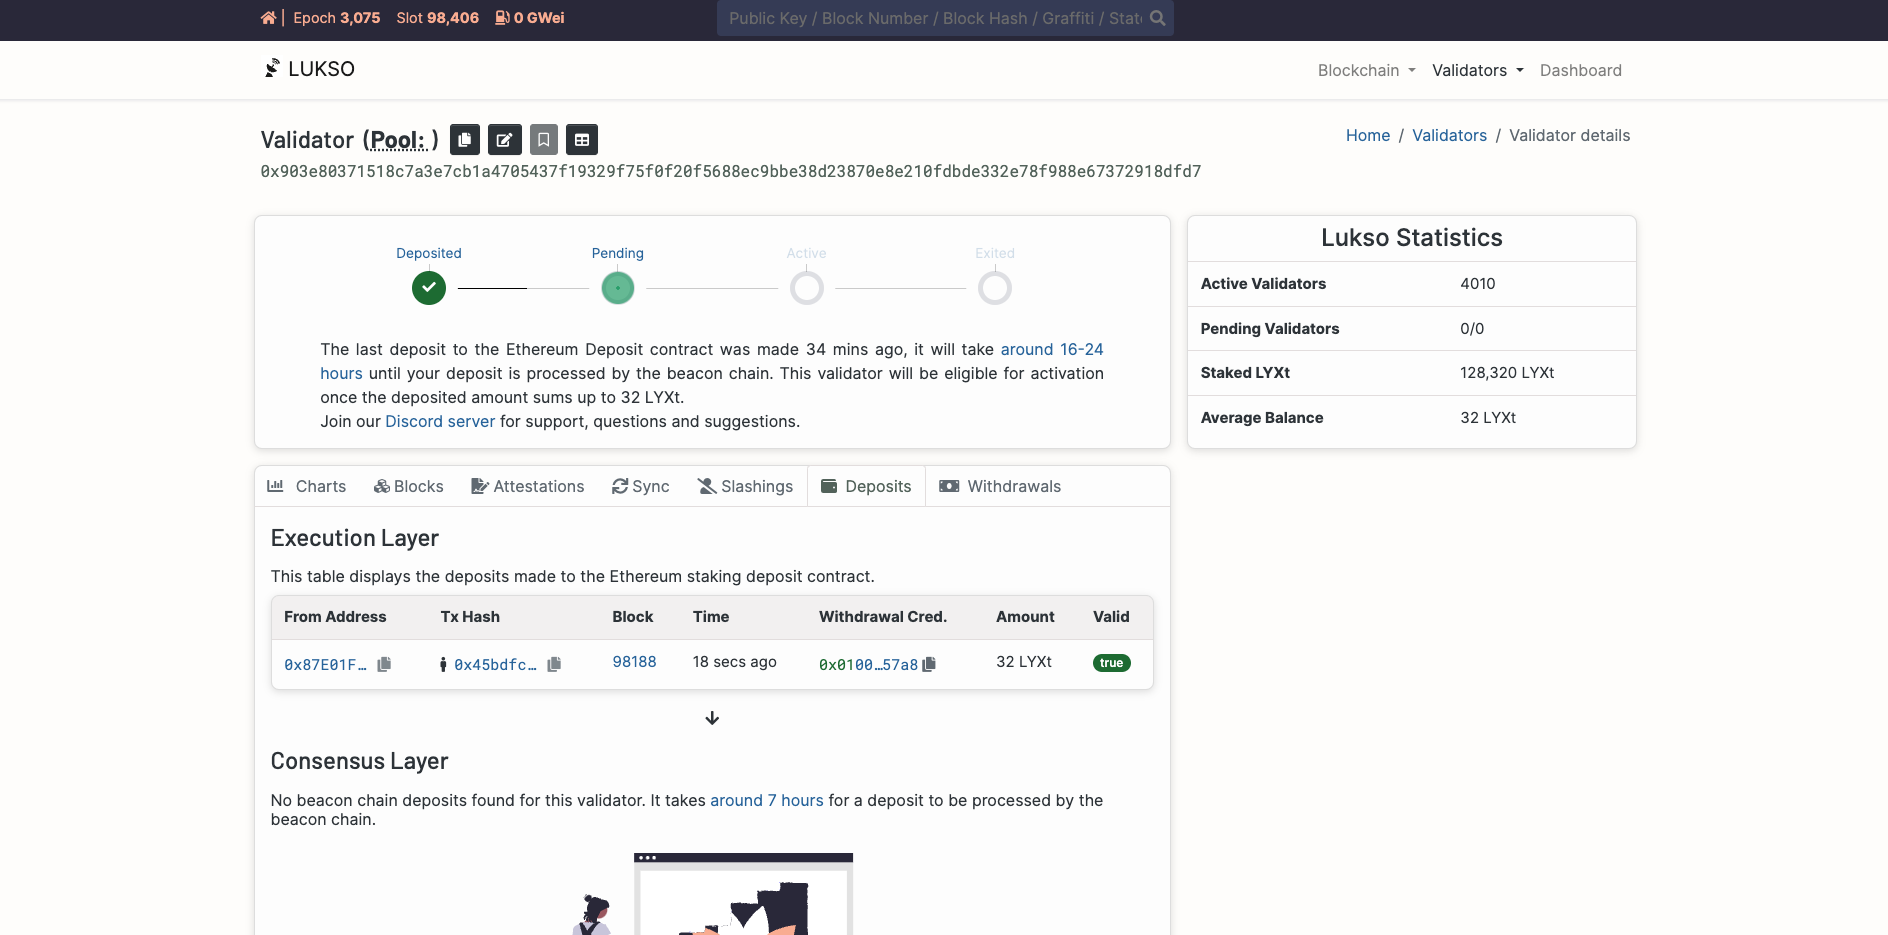
Genesis Validators
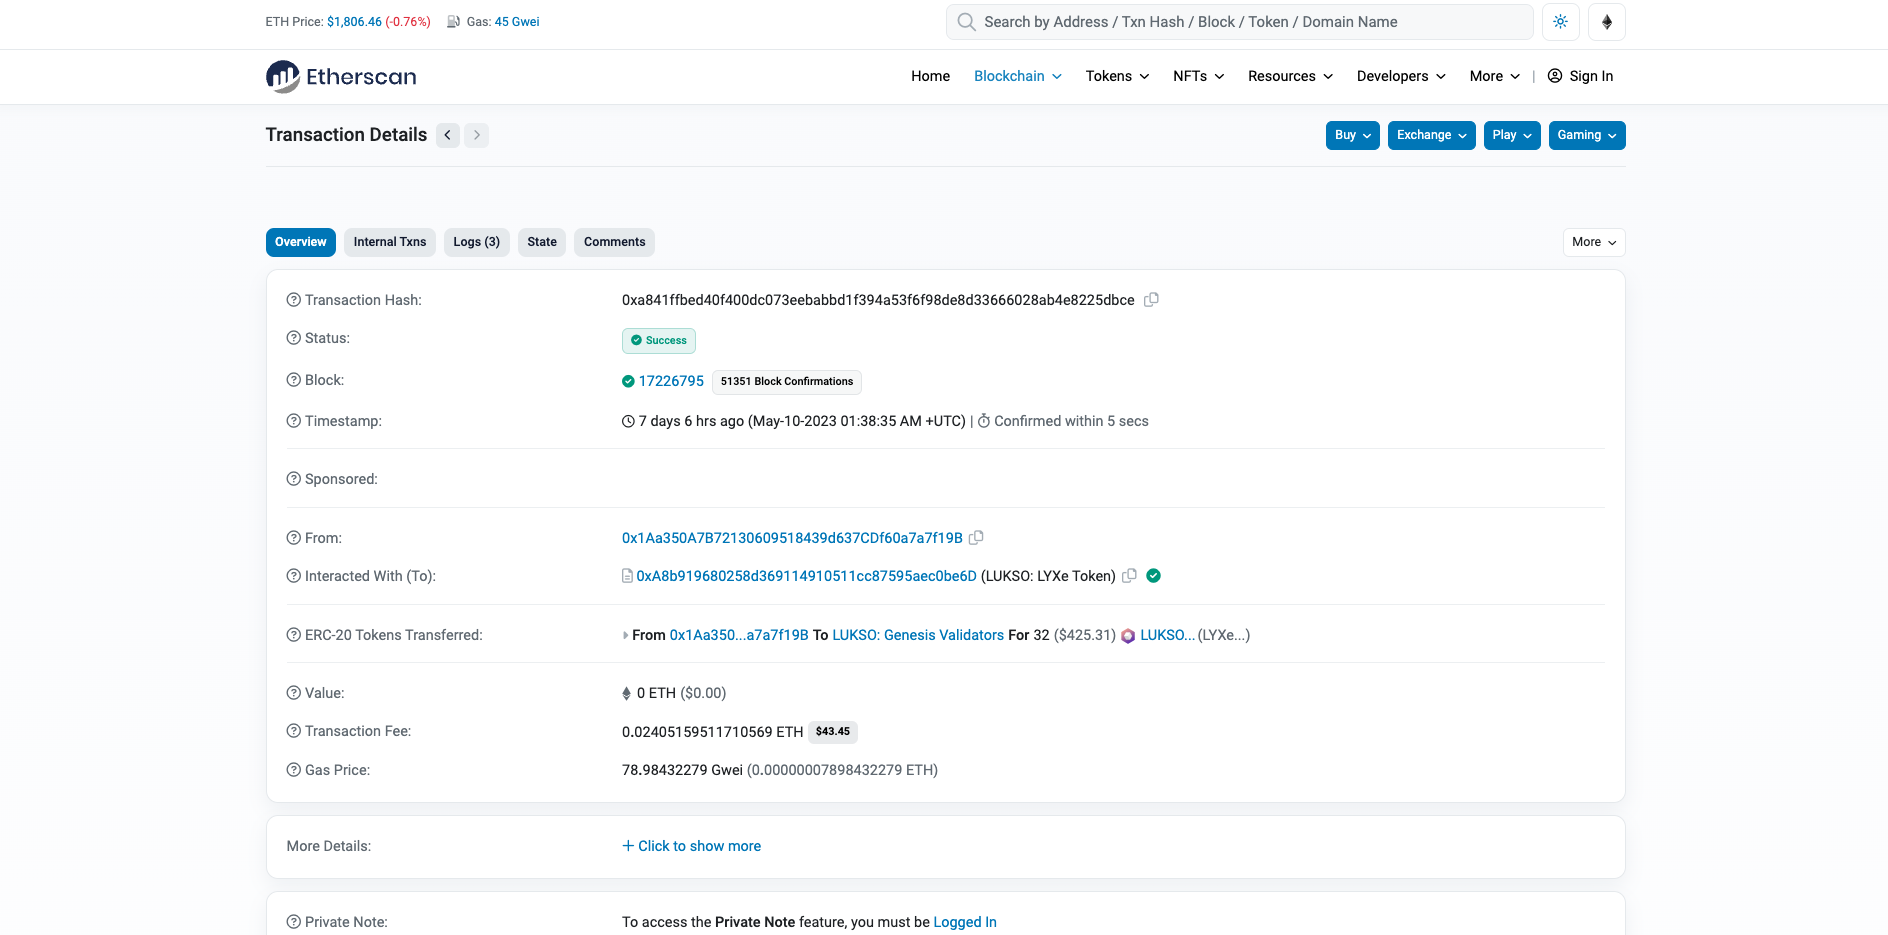
For Genesis Depositors, the Blockchain Explorer for Ethereum will show up, as the locking is done using the Ethereum-based representation of LYX:
You can also check the deposit files on the main page of the launchpod again:
If they are all green, your good to go. If not, repeat the process with only those keys that have remained gray. Do not forget to make a copy beforehand.
If you have a deposit file with all validator keys, after the first successful deposit as many deposits should be green as were listed in the first smaller deposit file.
Testnet and Mainnet Validators
For the Testnet and regular validators it will open up the beacon chain explorers as everything was done natively on the blockchain:
It will take up to 24 hours for the validator to get activated by the consensus of the network.